How to Install WordPress Manually
Most of the hosting provider provides QuickInstall feature, so it’s not necessary to install WordPress manually. If you are having trouble using QuickInstall or your hosting provider doesn’t have this feature enabled, you can install WordPress manually. This article covers everything step by step of this method. Besides, you can learn how to install WordPress with every major provider too.
Step 1: Download WordPress
You need to download the WordPress application in your local computer.
- Download WordPress from the official WordPress website
- Download link https://wordpress.org/download/
- Unzip the file in your local computer
Step 2: Upload WordPress in your Hosting
There are 3 different ways to upload WordPress in your hosting.
- Via FTP – You can upload the WordPress files to your Hosting via FTP. You can use Filezilla. Learn more about how to upload files via FTP.
- Via File Manager – You can upload WordPress using file manager in your hosting account
- Via SSH – Another way of uploading WordPress manually is using SSH
Step 3: Create a Mysql Database and User
WordPress stores all the information in its database. So it’s mandatory to create a database and assign a user with proper privileges to create, edit, modify and other functions.
- Login to your cPanel or hosting account
- In the database section click on Mysql Database
- Create a database – Enter a database name and click on create database
- Create a database user – Enter the database user name and password and click on create user
- Add user to the database – Assign the user into the specific database and click on All privileges checkbox
Save the information – Copy and store database name, user name and password. You will need them in future use.
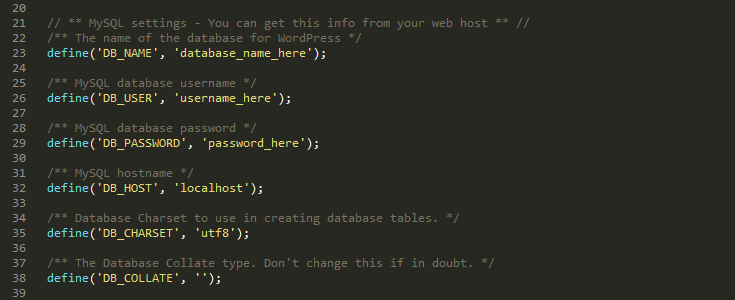
Step 4: Configure wp-config-sample.php file
The wp-config.php files store the database information. It connects the WordPress application with the database. So you need to update the database information in the wp-config file.
- Go to File Manager
- Find the wp-config-sample.php file
- Rename the wp-config-sample.php file to wp-config.php
- Right click on wp-config.php file and open it on code editor
- Update database information in the filedefine(‘DB_NAME’, ‘database_name_here’);
/** MySQL database username */
define(‘DB_USER’, ‘username_here’);
/** MySQL database password */
define(‘DB_PASSWORD’, ‘password_here’); - and click on Save Changes
Step 5: Run the Installation
In browser window, go to the installation page to run the installation script.
- http://yourdomain.com/wp-admin/install.php
Be sure to replace yourdomain.com in the example above with your actual domain name.
You should now see a welcome page.
Step 6: Complete the installation process
On this page, fill in the fields for:
- Site Name
- Username
- Password & confirm password
- Email address (login information will be sent to this email address)
- Select whether or not to have the search engines index the site
Click Install Now, and you should be taken to the final screen, showing the following message: Success! WordPress has been installed.
How to Install WordPress Locally
If you want to install WordPress locally on your local windows PC, this article will help you. This is a step by step guideline on how to install WordPress locally.
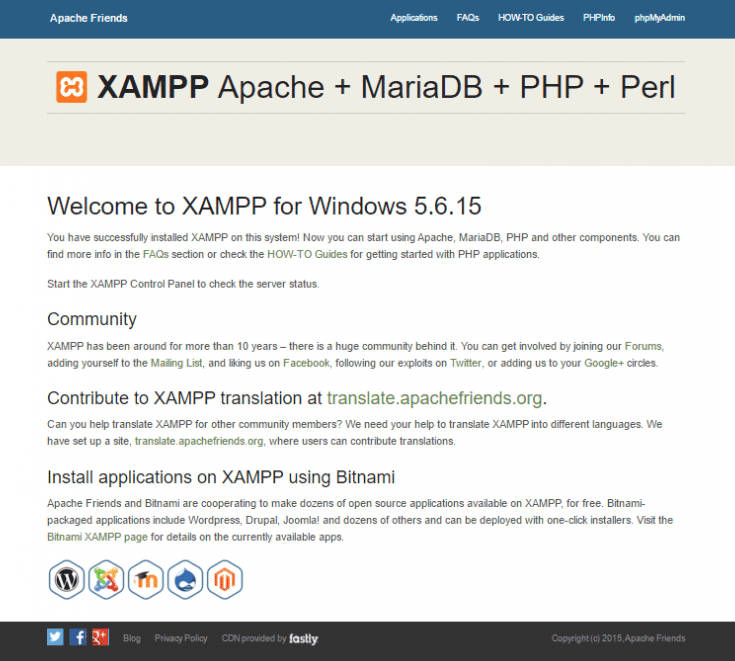
Step 1: Run XAMPP
I hope you have set up XAMPP on your local machine. WordPress is PHP based framework, it will need a server to run the application. So we choose XAMPP. It’s easy to install and easy to run on your local windows machine.
- Open XAMPP Control Panel in your local computer
- Start Apache and Mysql
They will be green if the services run perfectly.
You can check if your new local server is installed by visiting http://localhost in your browser.
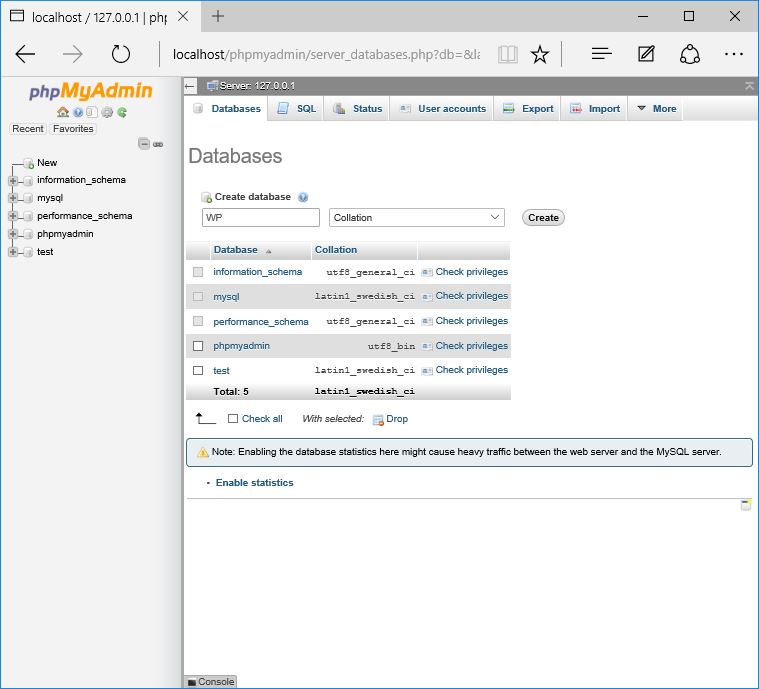
Step 2: Setting Up the Mysql Database
WordPress stores eveything in database. So before setting up WordPress, we need to create a mysql database.
- In your XAMPP Control Panel, click the Admin button in the MySQL section. PHPMyadmin interface will be opened.
- Click on Databases near the top-left and create a new database.
- Enter the database name (for example – mywp) and click on Create
Step 3: Download WordPress
To install WordPress in your local computer, you need to download WordPress first.
- Download WordPress from official Website. Link – https://wordpress.org/download/
- Unzip the file in your local computer
- Go to XAMPP folder on your PC
- Copy and paste the unzip WordPress into “htdocs” folder in XAMPP in your computer
- Rename the folder whatever you want it to be named. (For Example – mywpsite)
Step 4: Install the WordPress
Be careful about the file name, folder name, database name when installing WordPress locally.
- Open the file wp-config-sample.php file in the WordPress folder. (Ours is – mywpsite)
- Rename the file name wp-config-sample.php to wp-config.php
- Replace“database_name_here” with the name of your database. (Ours is – mywp)
- Replace “username_here” with “root” and leave “password_here” blank
- Save the file and close it
- Open your browser and go to http://localhost/mywpsite (use your own folder name instead of “mywpsite” )
Once you’ve chosen your language, continue onto the next screen and enter you username and password details. Click Install WordPress.
Your WordPress installation is now complete!
How to Install WordPress on a Server – One Click Installation
In this article we’ll cover the QuickInstall route of WordPress installation. Most of the hosting provider includes this one click installation feature. This is very easy and requires one or two clicks.
How to install WordPress using Quick Install (With Video):
One Click WordPress Installation Process
- Log into your cPanel.
- In the Software/Services section, click on the Quick Install icon
- In the left menu, under Popular Installs, click WordPress, then click Install WordPress
- Complete the form that appears with the below details
- The Base Domain for your installation
- The sub directory you would like the site to load from, if desired.
- Enter your admin email. The admin username and password will be emailed to this email.
- Enter the blog title. It will appear as your website title.
- Enter admin username, first name, last name
Click Install WordPress when you’re ready. And you are done!
How to Install WordPress in VPS
Though it could take up to an hour or two to setup WordPress in VPS, the degree of control a VPS can give is worth spending the time. The setup process is lengthy but easy and straightforward. Here we go with the steps:
- First, you need an up and running “droplet” from any VPS hosting company. My choice is Digital Ocean. Simple and cost effective. Sign up and have one of your own with some simple clicks.
- Login to your VPS via .ssh . Learn further about How To Connect To Your Droplet with SSH
- Follow the steps here to go up and running with your WordPress installation.
Further reading and troubleshooting:
- Proper file permission for WordPress
- To solve problem with pretty permalinks  this thread can help


Thanks for sharing The Awesome content. I will also share it with my friends. Great Content thanks a lot.